Showing posts with label Fall. Show all posts

Monday, November 18, 2013

2 Thanksgiving Felt and Burlap Banner


Thanksgiving is upon us... the season to be Grateful for all the blessing in our lives. What could be more special than to decorate my home with a
GIVE THANKS Banner
?

I decided to create a Burlap and Felt Banner to complement my Festive Decor.
I love creating projects using Burlap, but working with this material can sometimes be scary for its Fray like qualities. I remedy this problem by fusing the burlap with a great Fusible Web product, Steam-A-Seam2, which allows a temporary hold to both the applique and background materials until the final pressing.

Materials:
  • Felt Sheets: Fall Colors (Golden Rod, Olive, Cocoa Brown, Tan, Orange, Bright Yellow) or colors of your choice
  • 1/2 yard Burlap
  • Embroidery Floss: Brown, Dark Green
  • Buttons: 13 - 1/2"
  • Templates: Flags, Acorns, Letters. Download the Flags and Letters templates HERE, HERE, and HERE.
  • Freezer Paper
  • Plain white printer paper
  • Masking Tape
  • Double Stick Fusible Web: Steam-A-Seam2
  • Super Tacky Glue


Instructions:

Freezer Paper Sheets:

1. Cut 4 sheets of Freezer Paper that is just slightly smaller than your printer paper sheets.
Tape the freezer paper, shiny side down onto your printer paper sheet at each corner using the masking tape.

Load your freezer paper into the printer paper tray. I loaded mine facing down. You might want to check your printer loading directions. Remember: you want to print onto the freezer paper only. Print the Large flags and Letters using the Templates.


Flags:

2. Press the large Flags Freezer Paper sheets shiny side down onto 3 sheets of felt using a warm iron-no steam. Cut out your flags along the tracing lines. Set aside.

3. Using the small Flag template and following the Steam-A-Seam2 manufacturing directions; trace and stick the small flags onto the Burlap. Cut your flags along the tracing lines.

4. Fuse the small burlap flags onto the large felt flags.

5. Attach two flags by overlapping the top corners and sewing a button using the Dark Green embroidery floss. Continue overlapping and sewing until all 10 flags are attached.

6. Cut your Freezer Paper letters 1/4" roughly around the shape. Press each letter onto your choice of color felt using a warm iron-no steam. Cut your felt letters following the tracing lines.

7. Glue each letter to the Burlap side of the flags. Let dry completely.


Acorns:

8. I found my Acorn Template online and traced it twice on a small piece of Freezer Paper.
I then pressed the freezer paper shiny side down onto the tan and brown felt. Finally, I cut the pattern pieces along the traced lines.

9. Overlap each acorn top to the bottom and stitch around the edge and inside using the brown embroidery floss and the running stitch. Sew a button in the middle of each acorn top.

10. Using a button and the dark green floss; attach each completed acorn to the first and last flag. Create a small loop using the brown floss by sewing behind each Acorn to hang the banner.


I love how my Banner turned out. The Burlap gives the Banner a Rustic feeling of the Fall Season. The accent of the Felt Letters and Acorns compliment the Burlap Flags beautifully.

The use of Freeze paper makes it easier to cut the felt patterns more accurately, not to mention the ability to load it right into the printer tray without jamming it.... Amazing!!!

I hope you give this tutorial a try.
 

Have a Blessed and Bountiful Thanksgiving.


Featured on:


Linking to:

Visit thecsiproject.com Today's Creative Blog
Photobucket
See Vanessa Craft
Poofy Cheeks
52 Mantels
Foodie Friends Friday By Stephanie Lynn

Friday, October 26, 2012

9 Spooky Halloween Pumpkins


Halloween is fast approaching and a great time for the family to join together and have fun carving the all mighty Pumpkin. I love Halloween decorations, especially Decorative Pumpkins.
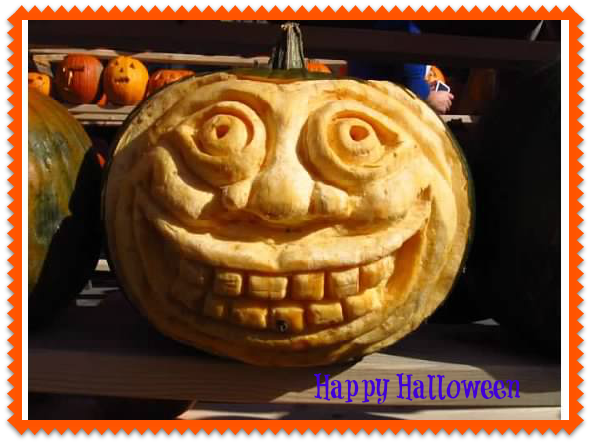
I must confess, I am not a fan of carving pumpkins; a sometimes labor intense task. Do not get me wrong; some carving inspirations found on the web are just awesome. Last Saturday, I attended the Pumpkin Festival in Keene, N.H., the carvings were just amazing. Go HERE to take a look at some of the pictures I took at the Festival.
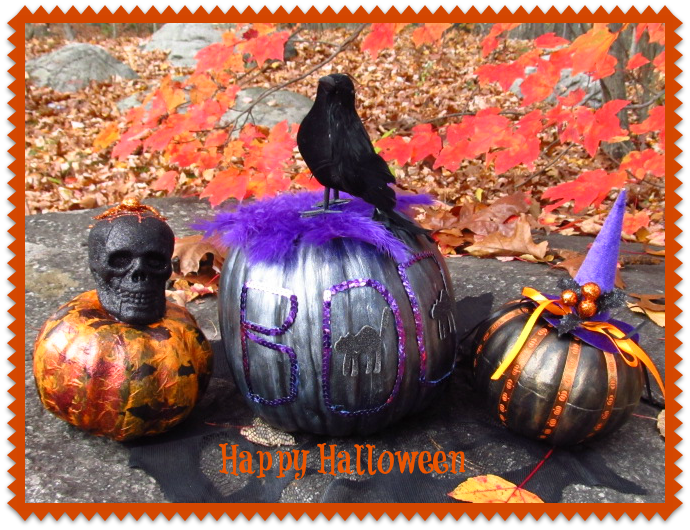
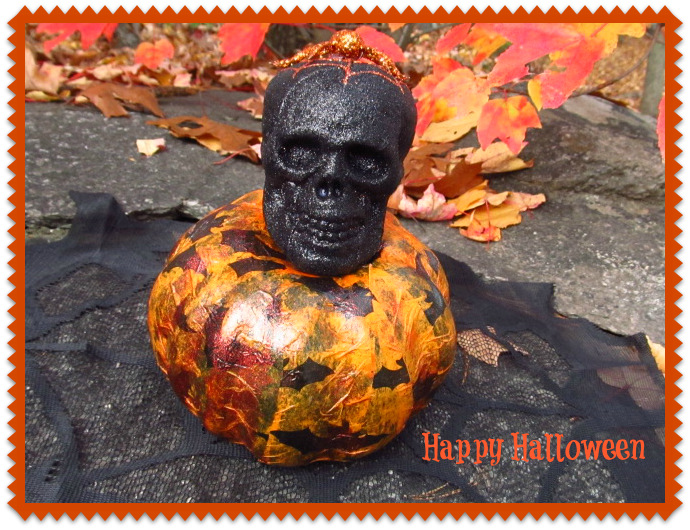
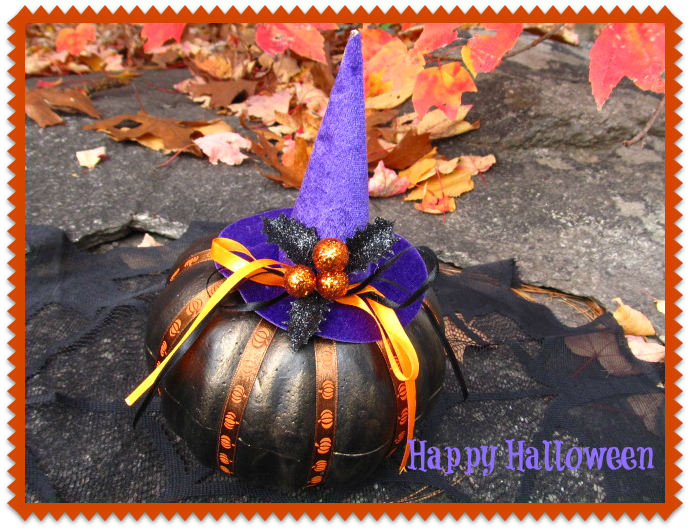
This year, I decided to decorate Craft Pumpkins and I just love how cute these pumpkins turned out.

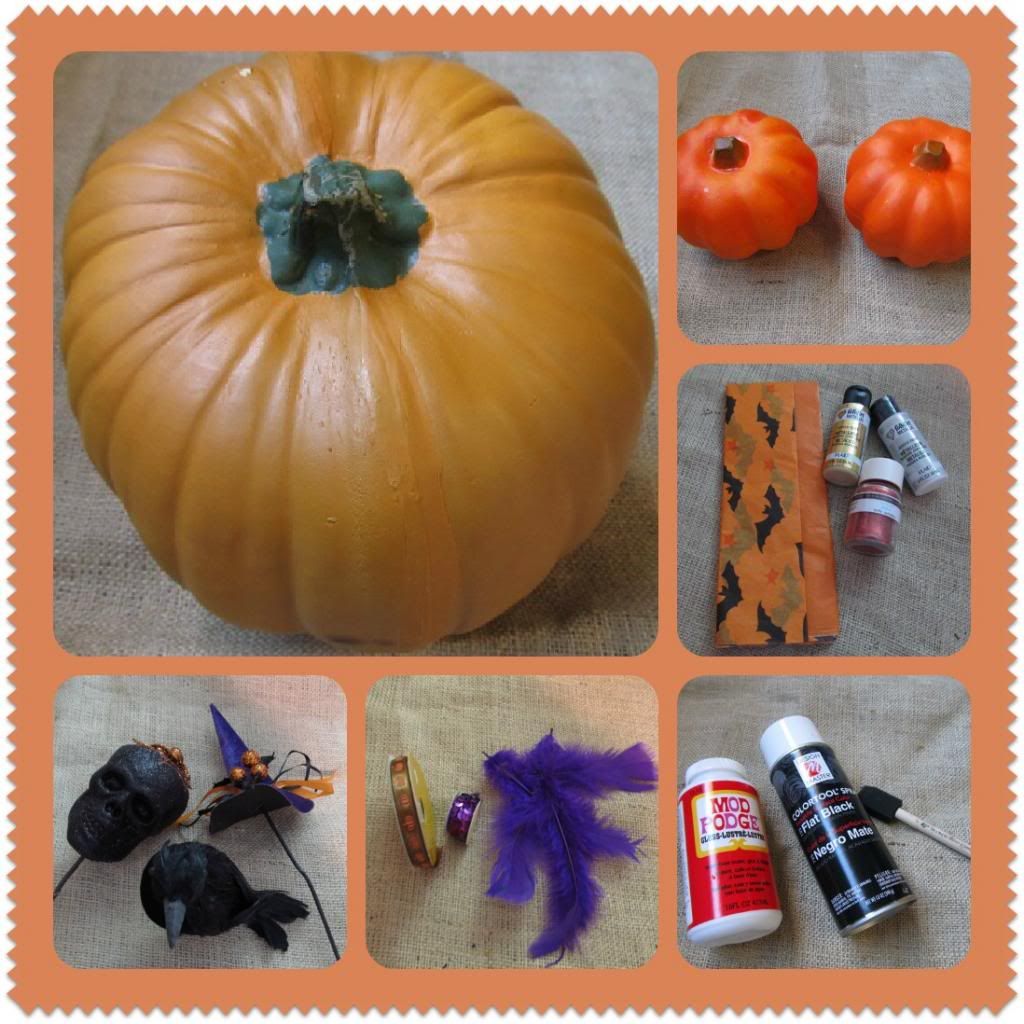
To begin, I gathered the following materials:

Materials:
  • 2 small and 1 large Craft Pumpkins. Purchased the small ones at the Dollar Store and the large one at my local Thrift shop
  • Halloween Tissue Paper
  • Plaid Folk Art Metallic Acrylic Paints. I used Pure Gold and Pearl White
  • Fine Glitter - I used Martha Stewart's Carnelian/Red Orange
  • Halloween Picks. I choose a Skull, Witch's Hat and a Black Crow
  • 3/8" decorative ribbons. I used Pumpkin print and sequins
  • Purple Feathers
  • Mod Podge
  • Spray Paint, I used Design Master Color Tool Spray in Flat Black; purchased at Michaels. When Spray painting foam Pumpkins make sure the Spray Paint is formulated for Styrofoam
  • Foam brush

  • Black felt
  • Hot glue gun & sticks
  • Elmer's Craft Bond glue pen

Directions:

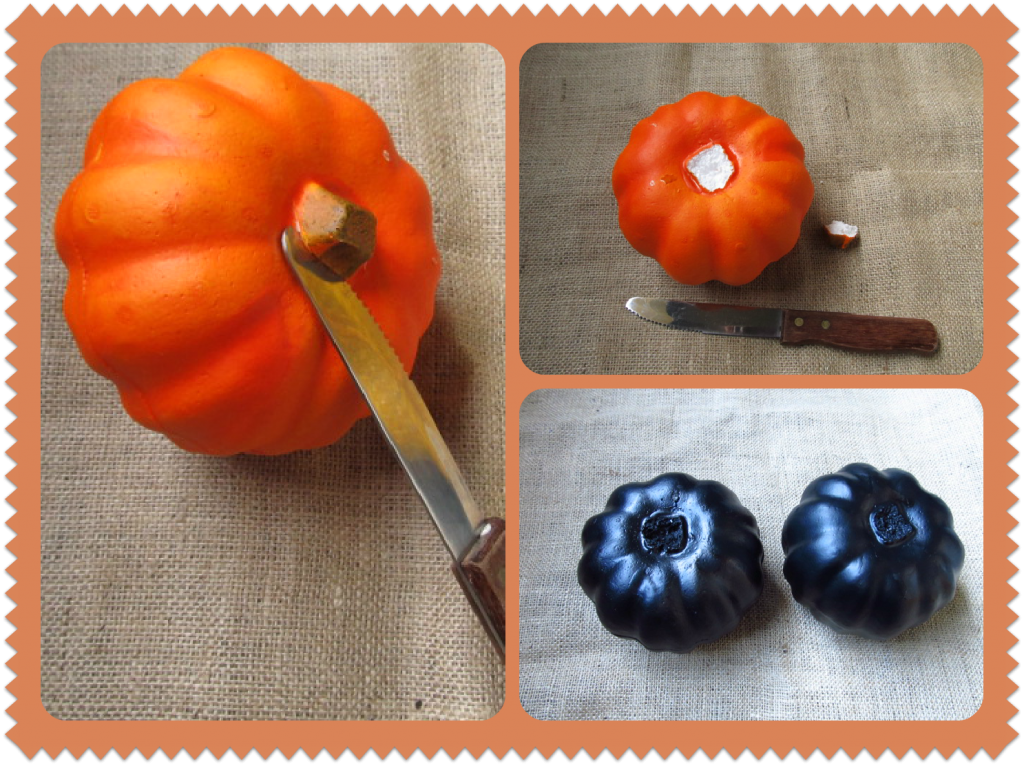
Cut pumpkin's stem with a serrated knife. Spray paint all the pumpkins. I gave mine 3 coats. Let dry completely.


Skull Pumpkin:
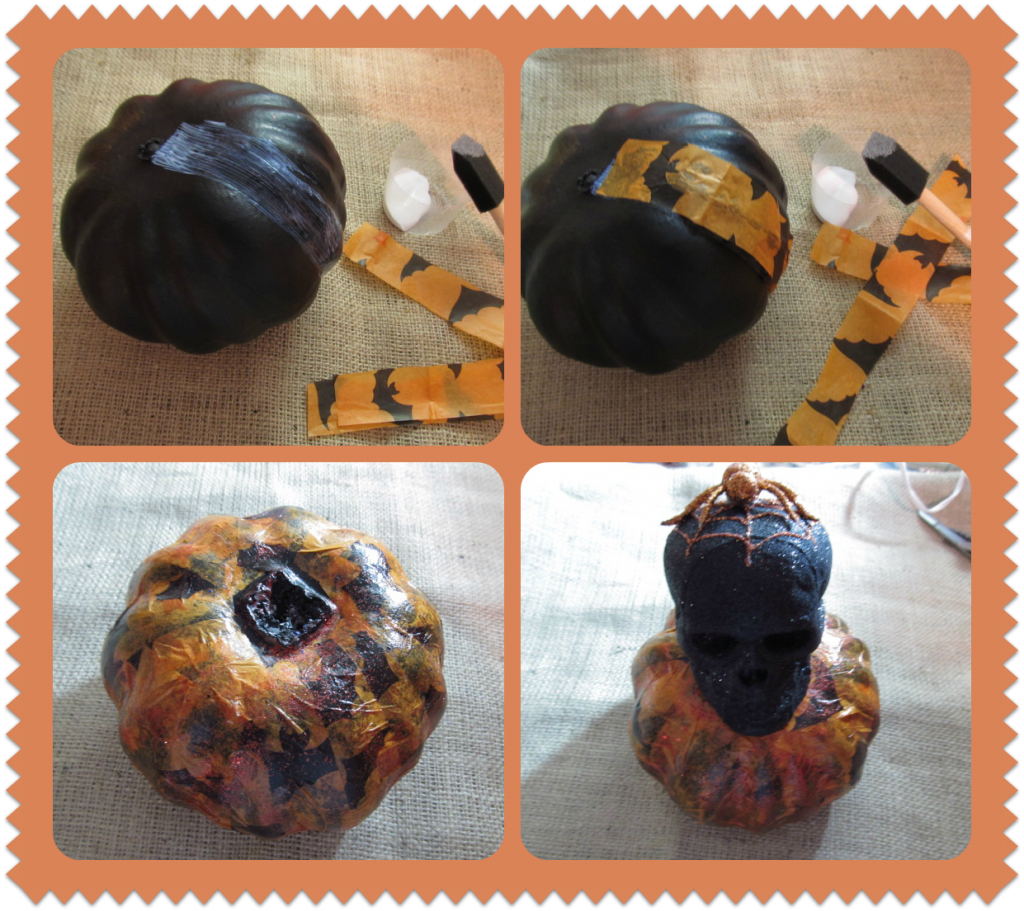
  1. Tear Tissue paper into small strips.
  2. Apply one coat of Mod Podge to pumpkin.
  3. Begin adding the tissue paper strips; smoothing the surface as you go to remove any air bubbles.
  4. Continue adding Mod Podge and paper strips until pumpkin is covered.
  5. Let dry 10-15 minutes
  6. Apply a final coat of Mod Podge all over the pumpkin and sprinkle glitter all over while the pumpkin's surface is still wet.
  7. Let pumpkin dry completely.
  8. Remove the stem from the Skull pick. Using hot glue gun, attach to pumpkin's top section.


Witch's Hat Pumpkin:
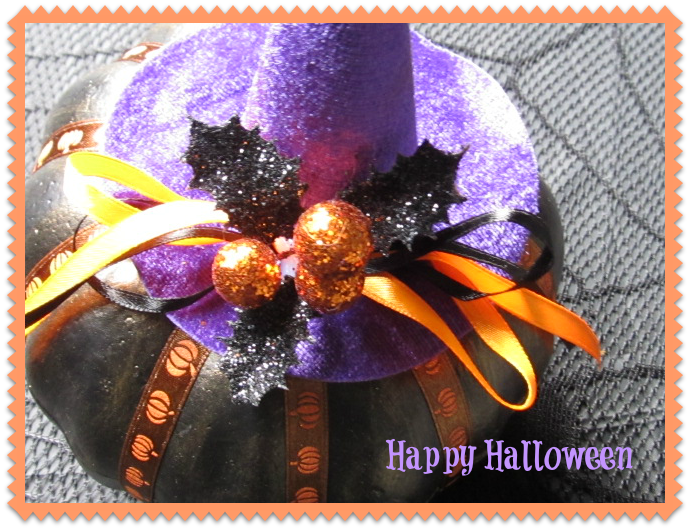
  1. Apply a thin coat of the Pure Gold Metallic paint over the entire pumpkin. Let dry completely.
  2. Begin wrapping ribbon around the pumpkin in a crisscross fashion from side to side; tacking ribbon with Elmer's glue.
  3. Continue wrapping and gluing ribbon until your pumpkin has ten ribbon strips.
  4. Trace and cut 2 small circles from black felt. Using hot glue gun, apply the circles to pumpkin's top and bottom centers. The felt circles will prevent the ribbon crossings from slipping.
  5. Remove the stem from the witch's hat and glue to pumpkin's top section.


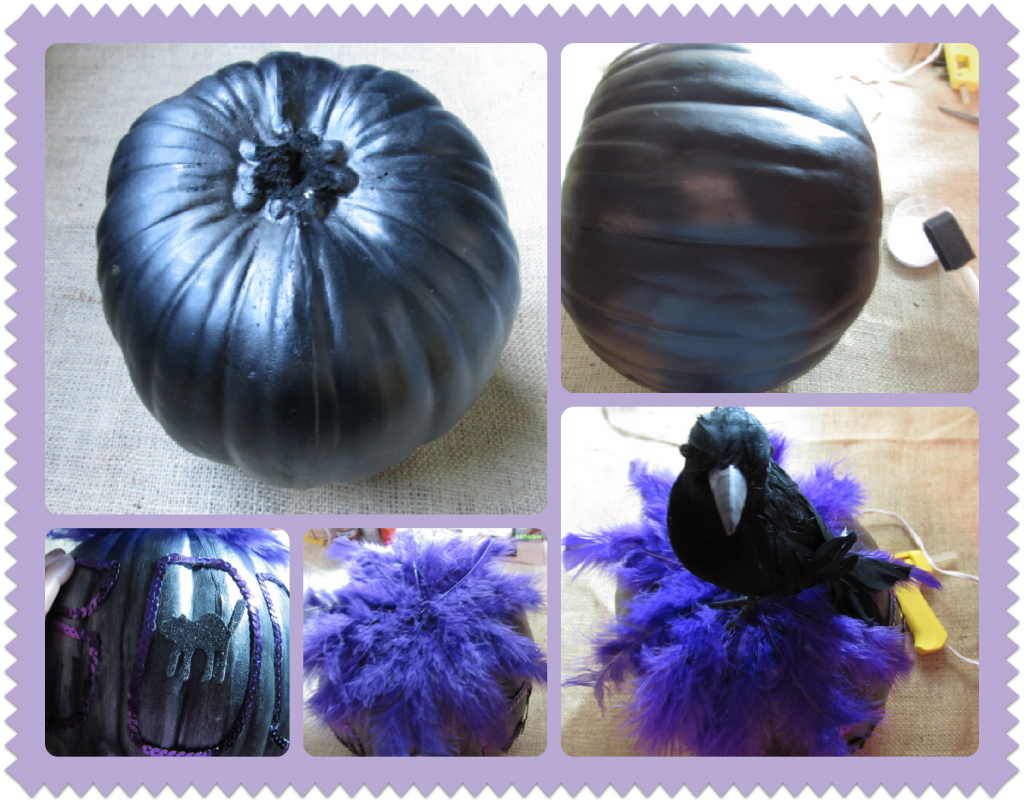
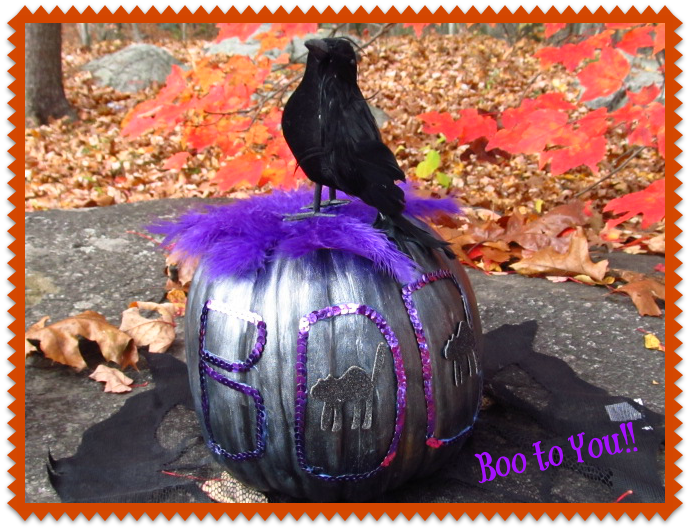
Purple Feathered Pumpkin:
  1. Apply a thin coat of Pearl White Metallic paint all over the pumpkin. Let dry completely.
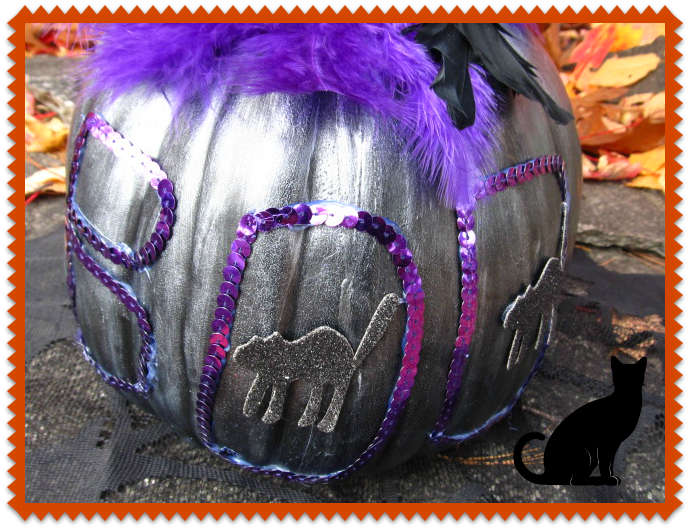
  2. Using the sequin ribbon, create and glue the word "BOO" onto the pumpkin's front section.
  3. Apply feathers to pumpkin's top using the hot glue gun. Let dry.
  4. Glue the black crow onto the feathers. Let dry.
  5. Finally apply other embellishments inside the letters "O".
    I used glittered cat cutouts.


Although Pumpkin carving is a Halloween tradition for most people, there are other ways to decorate a Pumpkin without carving it.
I just love how my Pumpkins turned out. They were easy and fun to decorate, and most of all; I save time and money by using these Craft Pumpkins.

HAPPY HALLOWEEN!!!

Linking to:
Today's Creative Blog
debbie-debbiedoos
Every Day is an Occasion


Tuesday, October 23, 2012

0 Pumpkin Festival, Keene, N.H.

Welcome to the Pumpkin Festival in Keene, N.H. It was a beautiful day with Summer like weather. The Foliage is still spectacular. It has been years since I visited the Festival. I was not disappointed. The thousands of Pumpkins were amazing. So many different carving inspirations... These pumpkins were even more dramatic when lit. This year Keene was trying to top Highwood, Illinois for the most lit Jack-O'-Lanterns. Last year this town topped the World Record and Keene was ready for the competition. To make this "Pumpkin War" more interesting, the Property Brothers for the popular network HGTV were present to witness and film the event at each respective town; with Drew in Keene and Jonathan in Highwood, Illinois. The event will be premiere on HGTV Wednesday, October 31st, 2012 at 9:00p.m. Read all about it HERE.

Keene had a total of 29,381 pumpkins and unfortunately could not set the 32,000 record. Keene is a proud town for its eight-time holder of The Guinness Book of World Records category for the most carved and lit pumpkins.


Go HERE to view the entire album.

Enjoy the pictures. Happy Halloween!!!!


Saturday, October 13, 2012

1 Foliage Fall 2012

The Foliage in New England is spectacular. Leaf Peeping is one of the reasons I love to visit New Hampshire in Autumn. I decided to take a Scenic drive through the beautiful White Mountains of New Hampshire, during the Columbus Day Weekend. This weekend was the perfect time for Leaf Peeping. My journey began in Lincoln via the Kancamagus Highway.This amazing highway stretches for 34.5 miles, offering an array of beautiful scenic areas. I thought I share my Foliage album and perhaps give you some inspiration to visit our beautiful New England States. Take a look at this drive suggested by Yankee Magazine, NH Drive.

Happy Fall!!

Click here to view these pictures larger

Friday, October 5, 2012

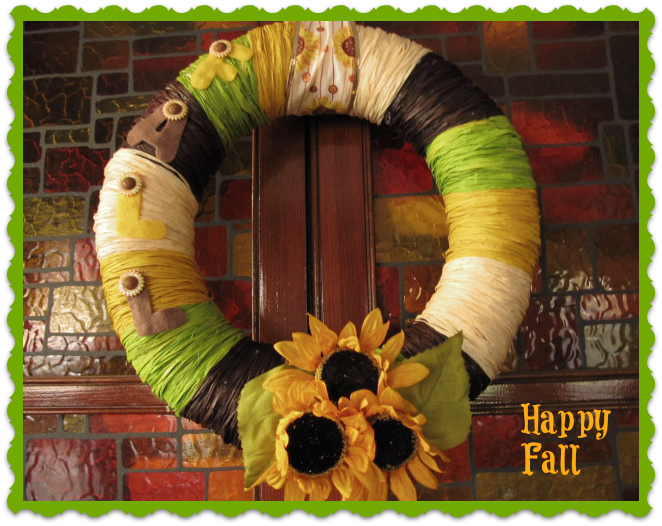
31 Raffia Sunflower Wreath


Oh AUTUMN!!! The Fall leaves are turning into beautiful hues of Orange, Red and the crisp Chartreuse.

I stumbled upon a few Raffia hanks in my craft stash. To my surprise they were the perfect color scheme to create a Country Fall Wreath.

Raffia is an inexpensive and versatile product with many decorative uses; from embellishments to covering a simple straw wreath.

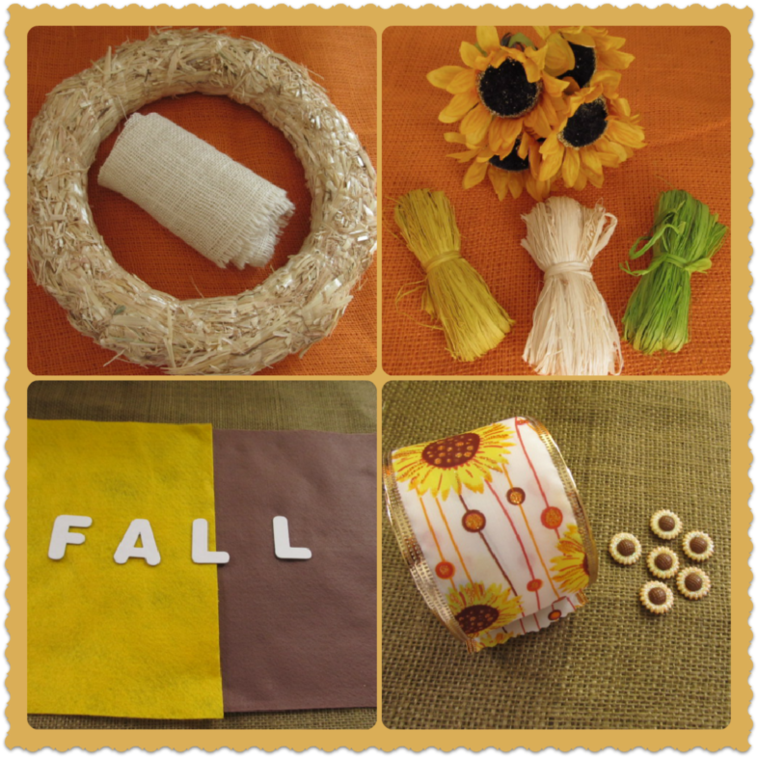
To begin, I gathered the following materials:

Materials:
  • 14" diameter Straw Wreath
  • Burlap - Natural Shade
  • Raffia Hanks - 2 or more colors
  • Fall Sunflower Stems
  • Felt
  • Chipboard Letters
  • Sunflower Adhesive Glitter Shapes
  • Ribbon - 2 1/2" wide
  • Hot Glue Gun and Glue Sticks
  • Sharp pair of Scissors
Directions:
Wreath:
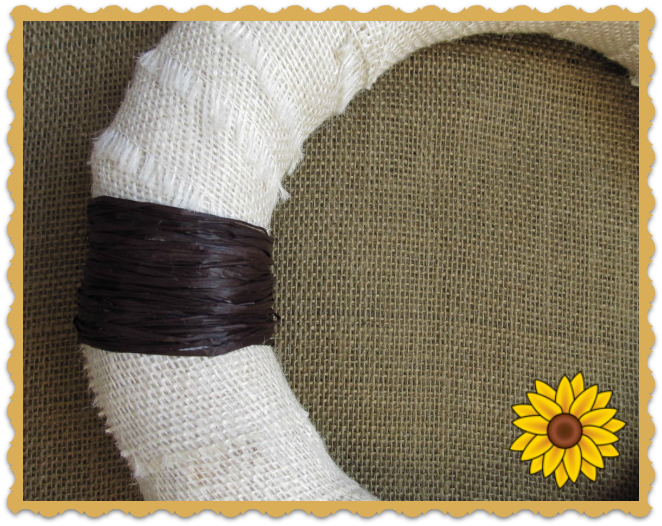
  1. Cut Burlap into strips measuring approximately 36" long.
  2. Wrap straw wreath with Burlap strips. Tack with hot glue gun as you wrap them around the wreath.
  3. Take several strands of each color Raffia. Glue ends together to form a cluster. Begin wrapping and gluing Raffia clusters around the wreath.
  4. Continue wrapping Raffia color clusters until the wreath is covered.
Embellishments:
  1. Cut wire from Sunflower Stems so that they lay flat once glued to the wreath.
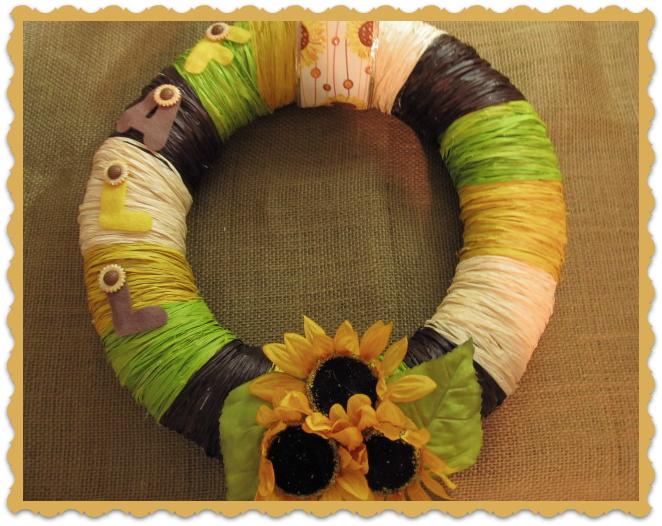
  2. Glue 3 Sunflowers to wreath's bottom section.
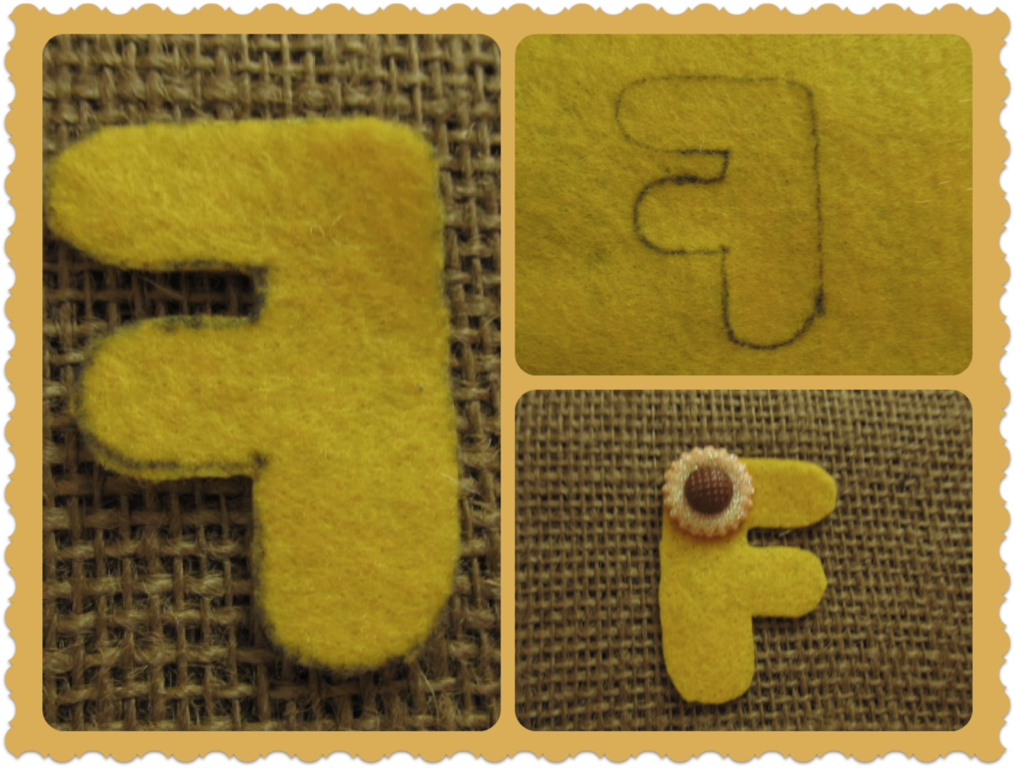
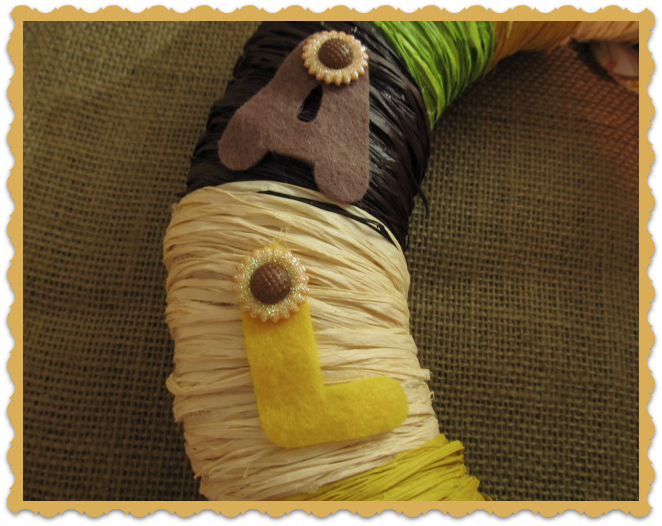
  3. Trace cardboard letters onto felt. I inversed my letters before tracing to avoid tracing lines from showing.
  4. Cut letters around tracing lines.
  5. Glue glittered shapes onto each letter's top section.
  6. Glue letters to either side of wreath to create your choosen word or phrase.
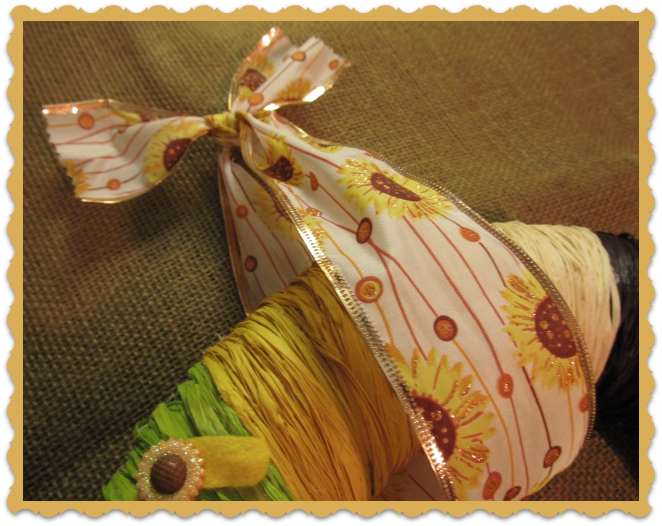
  7. Cut a piece of Ribbon measuring approximately 25" long. I used my Pinking shears to decorate the ribbon edges.
  8. Wrap ribbon around wreath's top section. Tie to make a knot.

And here it is.... my colorful Raffia wreath will add a country look to my Fall Decor. I love the rustic look and texture Raffia added to my wreath.

I hope you give this tutorial a try.

HAPPY FALL!!!!

Linking to:

Visit thecsiproject.com

Today's Creative Blog
debbie-debbiedoos


Pin It button on image hover