Showing posts with label Mason Jar. Show all posts

Sunday, October 19, 2014

5
Burlap Mason Jar Halloween Frame


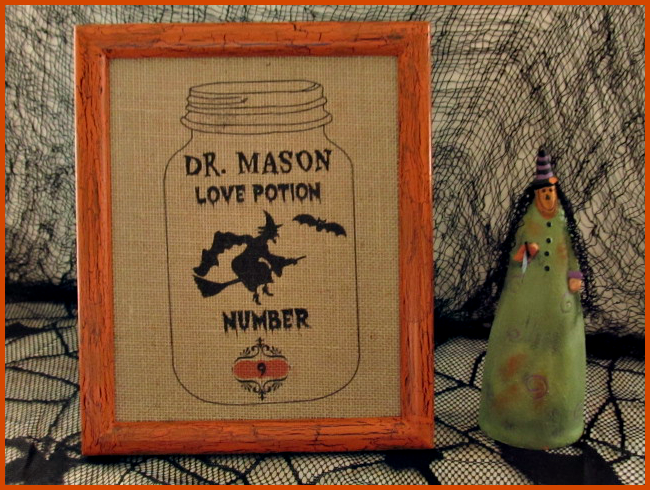
Boo Greetings!!! This time of the year is perfect to create amazing Fall and Halloween home decorations using Burlap. Last year I found an 8.5 x 11 (3 pack) printable laminated Burlap sheets at Walmart. I have wanted to try these sheets on my printer and finally decided to create a Mason jar printable I could turn into a frame.

Materials:
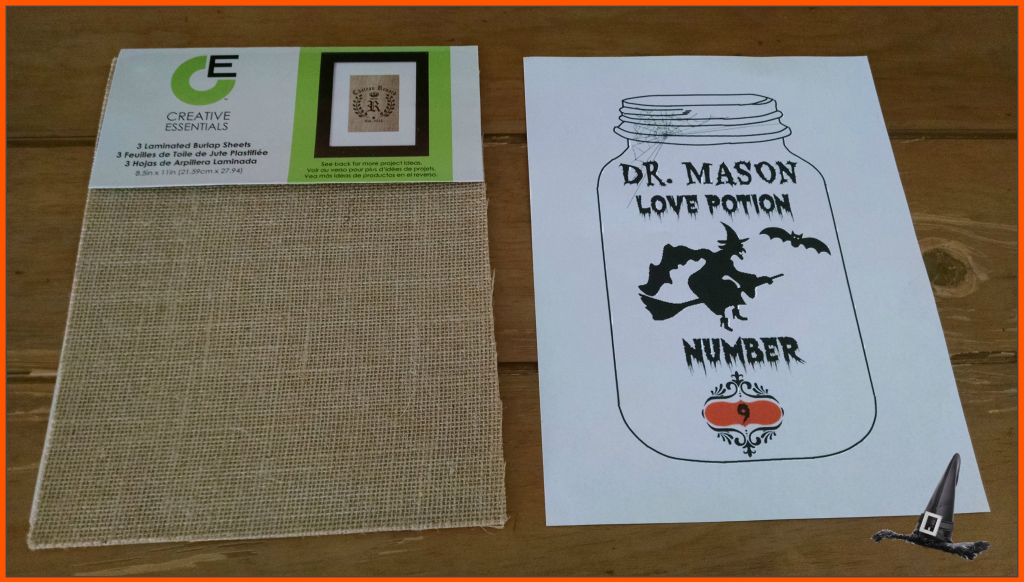
  • Laminated Burlap Sheets
  • Mason Jar printable
  • 8 x 10 Picture Frame
  • Black and Orange acrylic paint - optional
  • Crackle medium - optional


I found some cool images online of a Mason jar and a Witch. Using my favorite photo editor Picmonkey,
I created my printable using these images, overlays and spooky fonts from the wonderful Halloween collection Picmonkey provides.

If you wish to use my design to make your very own Mason jar frame, scroll down to download and print the file.


PLEASE NOTE: this file is for Personal use only. Please do not claim or sell it as your own!!!

Step 1: Print Image

Print the image onto the laminated burlap sheet. Let the inked sheet dry at least an hour before handling.

Step 2: Paint your Frame

If you wish to create a crackle effect for your frame, follow the directions given on the Crackle Medium bottle. I choose black as the base and orange as the contrasting paint color. Once your frame is dry, assemble your Burlap printable. I choose not to replace the frame glass. I wanted the Burlap to show through without the glass's reflection.

Your frame is ready for display. I just love the look of Crackled paint. This paint method makes your handmade Halloween creations more Spooktacular.....


Happy Halloween!!!!


Featured on:


Say Gday Feature

Linking to:

Craft Frenzy Friday Feature Today's Creative Blog
Photobucket
See Vanessa Craft
Poofy Cheeks
52 Mantels By Stephanie Lynn
ItsOverflowingLife on Lakeshore Drive
The DIY'ersCornerstone Confessions
Say G'Day Saturday

Monday, August 26, 2013

32 Ball Shore Coasters


Mason Jar crafts can be found everywhere these days. I can remember when the only use for them was "canning"... I love everything created using these versatile jars.

On a shopping trip to Marshall's, I stumbled upon a package of.... you guessed it.... Mason Jar Print napkins. As you can imagine, I took a double take. OMG... Mason Jar themed napkins !!! I left the store with only one purchase... I love this print of a Mason Jar relaxing by the Sea Shore...

This is such a beautiful print...


I thought these can make one of a kind Coasters.
I have not seen Mason Jar prints on napkins ever.
I think these napkins were just waiting for me... or just pure luck!!! Personally I think it was Destiny.... Here are materials I use to make the coasters...

Materials:
  • 4 - 4" Square Ceramic Tiles; purchased at Home Depot for 16 cents each
  • Mod Podge
  • Foam Brush
  • Decorative Napkins
  • Felt
  • Clear Acrylic Sealer
  • Pinking Shears
  • Pair of Tweezers
  • Hot Glue Gun

Instructions:

1. Using Tweezers, remove the outer layers of each Napkin.


2. Open the napkin and flatten the center folded lines as much as you can.
3. Cut one napkin into four equal sections. One napkin will make four coasters.
4. Apply a thin coat of Mod Podge all over the tile.
5. Apply Napkin to the tile. Smooth out with the brush or your fingers to remove any air bubbles and/or wrinkles.


6. Fold he napkin edges towards the back of the tile. Smooth with the foam brush dipped in Mod Podge. Let it dry 5-10 minutes.


7. Apply 2 more coats of Mod Podge all over the tile. Let dry 5-10 minutes between coats. Let dry completely.
For extra protection, spray a few coats of Acrylic Sealer all over the tiles. Let dry completely before applying the felt squares to the back of the tiles.

8. Using a tile as a guide trace and cut 4 felt squares to fit each tile. Glue the felt squares to the back of each tile.


And here they are... My Ball coasters are ready for my table. I hope the month of September is as warm and I get to enjoy them before the Fall decorations take over.... Regardless, I think I will keep them out to remind me of the warm and fun Summer I had.


Life is a Beach. Enjoy the rest of your SUMMER.


Linking to:

Visit thecsiproject.com Today's Creative Blog
Photobucket
See Vanessa Craft
Poofy Cheeks
52 Mantels
Foodie Friends Friday By Stephanie Lynn


Pin It button on image hover