Showing posts with label Burlap. Show all posts

Sunday, October 19, 2014

5
Burlap Mason Jar Halloween Frame


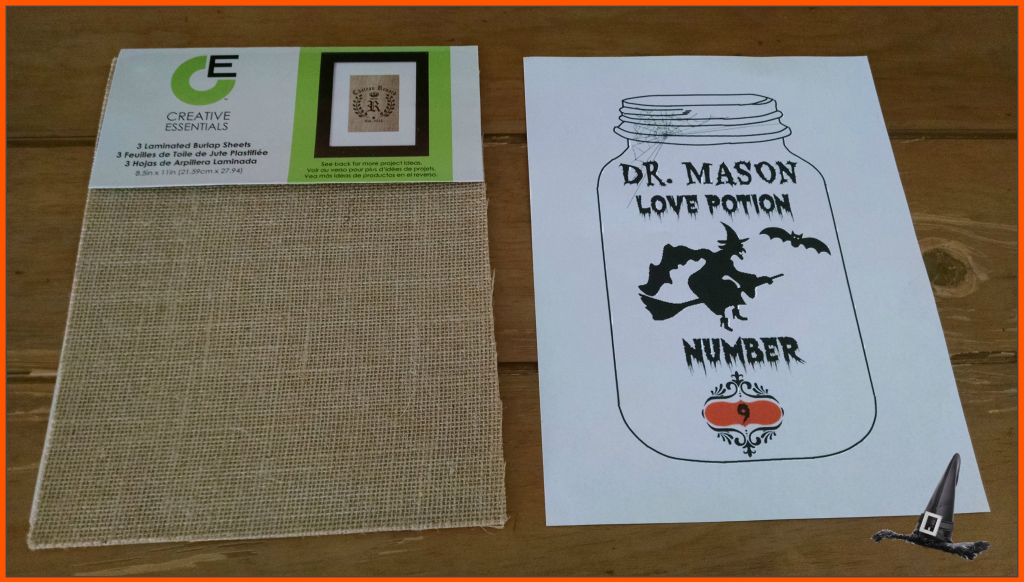
Boo Greetings!!! This time of the year is perfect to create amazing Fall and Halloween home decorations using Burlap. Last year I found an 8.5 x 11 (3 pack) printable laminated Burlap sheets at Walmart. I have wanted to try these sheets on my printer and finally decided to create a Mason jar printable I could turn into a frame.

Materials:
  • Laminated Burlap Sheets
  • Mason Jar printable
  • 8 x 10 Picture Frame
  • Black and Orange acrylic paint - optional
  • Crackle medium - optional


I found some cool images online of a Mason jar and a Witch. Using my favorite photo editor Picmonkey,
I created my printable using these images, overlays and spooky fonts from the wonderful Halloween collection Picmonkey provides.

If you wish to use my design to make your very own Mason jar frame, scroll down to download and print the file.


PLEASE NOTE: this file is for Personal use only. Please do not claim or sell it as your own!!!

Step 1: Print Image

Print the image onto the laminated burlap sheet. Let the inked sheet dry at least an hour before handling.

Step 2: Paint your Frame

If you wish to create a crackle effect for your frame, follow the directions given on the Crackle Medium bottle. I choose black as the base and orange as the contrasting paint color. Once your frame is dry, assemble your Burlap printable. I choose not to replace the frame glass. I wanted the Burlap to show through without the glass's reflection.

Your frame is ready for display. I just love the look of Crackled paint. This paint method makes your handmade Halloween creations more Spooktacular.....


Happy Halloween!!!!


Featured on:


Say Gday Feature

Linking to:

Craft Frenzy Friday Feature Today's Creative Blog
Photobucket
See Vanessa Craft
Poofy Cheeks
52 Mantels By Stephanie Lynn
ItsOverflowingLife on Lakeshore Drive
The DIY'ersCornerstone Confessions
Say G'Day Saturday

Monday, November 18, 2013

2 Thanksgiving Felt and Burlap Banner


Thanksgiving is upon us... the season to be Grateful for all the blessing in our lives. What could be more special than to decorate my home with a
GIVE THANKS Banner
?

I decided to create a Burlap and Felt Banner to complement my Festive Decor.
I love creating projects using Burlap, but working with this material can sometimes be scary for its Fray like qualities. I remedy this problem by fusing the burlap with a great Fusible Web product, Steam-A-Seam2, which allows a temporary hold to both the applique and background materials until the final pressing.

Materials:
  • Felt Sheets: Fall Colors (Golden Rod, Olive, Cocoa Brown, Tan, Orange, Bright Yellow) or colors of your choice
  • 1/2 yard Burlap
  • Embroidery Floss: Brown, Dark Green
  • Buttons: 13 - 1/2"
  • Templates: Flags, Acorns, Letters. Download the Flags and Letters templates HERE, HERE, and HERE.
  • Freezer Paper
  • Plain white printer paper
  • Masking Tape
  • Double Stick Fusible Web: Steam-A-Seam2
  • Super Tacky Glue


Instructions:

Freezer Paper Sheets:

1. Cut 4 sheets of Freezer Paper that is just slightly smaller than your printer paper sheets.
Tape the freezer paper, shiny side down onto your printer paper sheet at each corner using the masking tape.

Load your freezer paper into the printer paper tray. I loaded mine facing down. You might want to check your printer loading directions. Remember: you want to print onto the freezer paper only. Print the Large flags and Letters using the Templates.


Flags:

2. Press the large Flags Freezer Paper sheets shiny side down onto 3 sheets of felt using a warm iron-no steam. Cut out your flags along the tracing lines. Set aside.

3. Using the small Flag template and following the Steam-A-Seam2 manufacturing directions; trace and stick the small flags onto the Burlap. Cut your flags along the tracing lines.

4. Fuse the small burlap flags onto the large felt flags.

5. Attach two flags by overlapping the top corners and sewing a button using the Dark Green embroidery floss. Continue overlapping and sewing until all 10 flags are attached.

6. Cut your Freezer Paper letters 1/4" roughly around the shape. Press each letter onto your choice of color felt using a warm iron-no steam. Cut your felt letters following the tracing lines.

7. Glue each letter to the Burlap side of the flags. Let dry completely.


Acorns:

8. I found my Acorn Template online and traced it twice on a small piece of Freezer Paper.
I then pressed the freezer paper shiny side down onto the tan and brown felt. Finally, I cut the pattern pieces along the traced lines.

9. Overlap each acorn top to the bottom and stitch around the edge and inside using the brown embroidery floss and the running stitch. Sew a button in the middle of each acorn top.

10. Using a button and the dark green floss; attach each completed acorn to the first and last flag. Create a small loop using the brown floss by sewing behind each Acorn to hang the banner.


I love how my Banner turned out. The Burlap gives the Banner a Rustic feeling of the Fall Season. The accent of the Felt Letters and Acorns compliment the Burlap Flags beautifully.

The use of Freeze paper makes it easier to cut the felt patterns more accurately, not to mention the ability to load it right into the printer tray without jamming it.... Amazing!!!

I hope you give this tutorial a try.
 

Have a Blessed and Bountiful Thanksgiving.


Featured on:


Linking to:

Visit thecsiproject.com Today's Creative Blog
Photobucket
See Vanessa Craft
Poofy Cheeks
52 Mantels
Foodie Friends Friday By Stephanie Lynn

Pin It button on image hover